Handlers
Overview
It is quite difficult to foresee all possible installation cases. Instead of trying to find all use cases, SWUpdate let the developer free to add his own installer (that is, a new handler), that must be responsible to install an image of a certain type. An image is marked to be of a defined type to be installed with a specific handler.
The parser make the connection between ‘image type’ and ‘handler’. It fills a table containing the list of images to be installed with the required handler to execute the installation. Each image can have a different installer.
Supplied handlers
- In mainline there are the handlers for the most common cases. They include:
flash devices in raw mode (both NOR and NAND)
UBI volumes
UBI volumes partitioner
raw flashes handler (NAND, NOR, SPI-NOR, CFI interface)
disk partitioner
raw devices, such as a SD Card partition
bootloader (U-Boot, GRUB, EFI Boot Guard) environment
Lua scripts handler
shell scripts handler
rdiff handler
readback handler
archive (zo, tarballs) handler
remote handler
microcontroller update handler
For example, if an image is marked to be updated into a UBI volume, the parser must fill a supplied table setting “ubi” as required handler, and filling the other fields required for this handler: name of volume, size, and so on.
Creating own handlers
SWUpdate can be extended with new handlers. The user needs to register his own handler with the core and he must provide the callback that SWUpdate uses when an image required to be installed with the new handler.
The prototype for the callback is:
int my_handler(struct img_type *img,
        void __attribute__ ((__unused__)) *data)
The most important parameter is the pointer to a struct img_type. It describes a single image and inform the handler where the image must be installed. The file descriptor of the incoming stream set to the start of the image to be installed is also part of the structure.
The structure img_type contains the file descriptor of the stream pointing to the first byte of the image to be installed. The handler must read the whole image, and when it returns back SWUpdate can go on with the next image in the stream.
The data parameter is usually a pointer that was registered with the
handler. For script handlers it is instead a pointer to a struct
script_handler_data which contains a script_fn enum value,
indicating the current installation phase, and the registered data
pointer.
SWUpdate provides a general function to extract data from the stream and copy to somewhere else:
int copyfile(int fdin, int fdout, int nbytes, unsigned long *offs,
        int skip_file, int compressed, uint32_t *checksum, unsigned char *hash);
fdin is the input stream, that is img->fdin from the callback. The hash, in case of signed images, is simply passed to copyfile() to perform the check, exactly as the checksum parameter. copyfile() will return an error if checksum or hash do not match. The handler does not need to bother with them. How the handler manages the copied data, is specific to the handler itself. See supplied handlers code for a better understanding.
The handler’s developer registers his own handler with a call to:
__attribute__((constructor))
void my_handler_init(void)
{
        register_handler("mytype", my_handler, my_mask, data);
}
SWUpdate uses the gcc constructors, and all supplied handlers are registered when SWUpdate is initialized.
register_handler has the syntax:
register_handler(my_image_type, my_handler, my_mask, data);
Where:
my_image_type : string identifying the own new image type.
my_handler : pointer to the installer to be registered.
my_mask :
HANDLER_MASKenum value(s) specifying what input type(s) my_handler can process.data : an optional pointer to an own structure, that SWUpdate saves in the handlers’ list and pass to the handler when it will be executed.
Dummy Handler
The always built-in and aptly named dummy handler copies the artifact
to /dev/null, effectively skipping it and advancing to the next
artifact, if any.
UBI Volume Handler
The UBI volume handler will update UBI volumes without changing the
layout on the storage. Therefore, volumes must be created/adjusted
beforehand. This can be done using the partitions tag (see
partitions : UBI layout).
The UBI volume handler will search for volumes in all MTD devices (unless blacklisted, see UBIBLACKLIST) to find the volume into which the image shall be installed. For this reason, volume names must be unique within the system. Two volumes with the same name are not supported and will lead to unpredictable results (SWUpdate will install the image to the first volume with that name it finds, which may not be right one!).
When updating volumes, it is guaranteed that erase counters are
preserved and not lost. The behavior of updating is identical to that
of the ubiupdatevol(1) tool from mtd-utils. In fact, the same
library from mtd-utils (libubi) is reused by SWUpdate.
atomic volume renaming
The UBI volume handler has basic support for carrying out atomic
volume renames by defining the replaces property, which must
contain a valid UBI volume name. After successfully updating the image
to volume, an atomic swap of the names of volume and
replaces is done. Consider the following example
{
        filename ="u-boot.img";
        volume ="u-boot_r";
        properties: {
                replaces = "u-boot";
        }
}
After u-boot.img is successfully installed into the volume “u-boot_r”, the volume “u-boot_r” is renamed to “u-boot” and “u-boot” is renamed to “u-boot_r”.
This mechanism allows one to implement a simple double copy update
approach without the need of shared state with the bootloader. For
example, the U-Boot SPL can be configured to always load U-Boot from
the volume u-boot without the need to access the environment. The
volume replace functionality will ensure that this volume name always
points to the currently valid volume.
However, please note the following limitations:
Currently the rename takes place after each image was installed successfully. Hence, it only makes sense to use this feature for images that are independent of the other installed images. A typical example is the bootloader. This behavior may be modified in the future to only carry out one atomic rename after all images were installed successfully.
Atomic renames are only possible and permitted for volumes residing on the same UBI device.
There is a handler ubiswap that allow one to do an atomic swap for several ubi volume after all the images were flashed. This handler is a script for the point of view of SWUpdate, so the node that provide it the data should be added in the section scripts.
scripts: (
        {
                type = "ubiswap";
                properties: {
                        swap-0 = [ "boot" , " boot_r" ];
                        swap-1 = [ "kernel" , "kernel_r" ];
                        swap-2 = [ "rootfs" , "rootfs_r" ];
                },
        },
);
WARNING: if you use the property replaces on an ubi volume that is also used with the handler ubiswap, this ubi volume will be swapped twice. It’s probably not what you want …
volume auto resize
The UBI volume handler has support to auto resize before flashing an
image with the property auto-resize. When this property is set
on an image, the ubi volume is resized to fit exactly the image.
{
        filename = "u-boot.img";
        device = "mtd0";
        volume = "u-boot_r";
        properties: {
                auto-resize = "true";
        }
}
WARNING: when this property is used, the device must be defined.
volume always remove
The UBI volume handler has support to always remove ubi volume
before flashing with the property always-remove. When this property
is set on an image, the ubi volume is always removed. This property
should be used with property auto-resize.
{
        filename = "u-boot.img";
        device = "mtd0";
        volume = "u-boot_r";
        properties: {
                always-remove = "true";
                auto-resize = "true";
        }
}
size properties
Due to a limit in the Linux kernel API for UBI volumes, the size reserved to be written on disk should be declared before actually writing anything. Unfortunately, the size of an encrypted or compressed image is not known until the decryption or decompression finished. This prevents correct declaration of the file size to be written on disk.
For this reason UBI images can declare the special properties “decrypted-size” or “decompressed-size” like this:
images: ( {
                filename = "rootfs.ubifs.enc";
                volume = "rootfs";
                encrypted = true;
                properties: {
                        decrypted-size = "104857600";
                }
        },
        {
                filename = "homefs.ubifs.gz";
                volume = "homefs";
                compressed = "zlib";
                properties: {
                        decompressed-size = "420000000";
                }
        }
);
The real size of the image should be calculated and written to the sw-description before assembling the cpio archive. In this example, 104857600 is the size of the rootfs after the decryption: the encrypted size is by the way larger. The decompressed size is of the homefs is 420000000.
The sizes are bytes in decimal notation.
Lua Handlers
In addition to the handlers written in C, it is possible to extend
SWUpdate with handlers written in Lua that get loaded at SWUpdate
startup. The Lua handler source code file may either be embedded
into the SWUpdate binary via the CONFIG_EMBEDDED_LUA_HANDLER
config option or has to be installed on the target system in Lua’s
search path as swupdate_handlers.lua so that it can be loaded
by the embedded Lua interpreter at run-time.
In analogy to C handlers, the prototype for a Lua handler is
--- Lua Handler.
--
--- @param  image  img_type  Lua equivalent of `struct img_type`
--- @return number           # 0 on success, 1 on error
function lua_handler(image)
    ...
end
where image is a Lua table (with attributes according to
sw-description’s attribute reference)
that describes a single artifact to be processed by the handler
(also see the Lua Handler Interface Specification in handlers/swupdate.lua,
reproduced for convenience in Section Lua Handler Interface Specification).
Note that dashes in the attributes’ names are replaced with
underscores for the Lua domain to make them idiomatic, e.g.,
installed-directly becomes installed_directly in the
Lua domain.
For a script handler written in Lua, the prototype is
--- Lua Handler.
--
--- @param  image     img_type  Lua equivalent of `struct img_type`
--- @param  scriptfn  string    Type, one of `preinst` or `postinst`
--- @return number              # 0 on success, 1 on error
function lua_handler(image, scriptfn)
    ...
end
where scriptfn is either "preinst" or "postinst".
To register a Lua handler, the swupdate module provides the
swupdate.register_handler() method that takes the handler’s
name, the Lua handler function to be registered under that name,
and, optionally, the types of artifacts for which the handler may
be called. If the latter is not given, the Lua handler is registered
for all types of artifacts. The following call registers the
above function lua_handler as my_handler which may be
called for images:
swupdate.register_handler("my_handler", lua_handler, swupdate.HANDLER_MASK.IMAGE_HANDLER)
A Lua handler may call C handlers (“chaining”) via the
swupdate.call_handler() method. The callable and registered
C handlers are available (as keys) in the table
swupdate.handler. The following Lua code is an example of
a simple handler chain-calling the rawfile C handler:
--- Lua Handler.
--
--- @param  image  img_type  Lua equivalent of `struct img_type`
--- @return number           # 0 on success, 1 on error
function lua_handler(image)
    if not swupdate.handler["rawfile"] then
        swupdate.error("rawfile handler not available")
        return 1
    end
    image.path = "/tmp/destination.path"
    local err, msg = swupdate.call_handler("rawfile", image)
    if err ~= 0 then
        swupdate.error(string.format("Error chaining handlers: %s", msg))
        return 1
    end
    return 0
end
Note that when chaining handlers and calling a C handler for
a different type of artifact than the Lua handler is registered
for, the image table’s values must satisfy the called
C handler’s expectations: Consider the above Lua handler being
registered for “images” (swupdate.HANDLER_MASK.IMAGE_HANDLER)
via the swupdate.register_handler() call shown above. As per the
sw-description’s attribute reference,
the “images” artifact type doesn’t have the path attribute
but the “file” artifact type does. So, for calling the rawfile
handler, image.path has to be set prior to chain-calling the
rawfile handler, as done in the example above. Usually, however,
no such adaptation is necessary if the Lua handler is registered for
handling the type of artifact that image represents.
In addition to calling C handlers, the image table passed as
parameter to a Lua handler has a image:copy2file() method that
implements the common use case of writing the input stream’s data
to a file, which is passed as this method’s argument. On success,
image:copy2file() returns 0 or -1 plus an error
message on failure. The following Lua code is an example of
a simple handler calling image:copy2file():
--- Lua Handler.
--
--- @param  image  img_type  Lua equivalent of `struct img_type`
--- @return number           # 0 on success, 1 on error
function lua_handler(image)
    local err, msg = image:copy2file("/tmp/destination.path")
    if err ~= 0 then
        swupdate.error(string.format("Error calling copy2file: %s", msg))
        return 1
    end
    return 0
end
Beyond using image:copy2file() or chain-calling C handlers,
the image table passed as parameter to a Lua handler has
a image:read(<callback()>) method that reads from the input
stream and calls the Lua callback function <callback()> for
every chunk read, passing this chunk as parameter. On success,
0 is returned by image:read(). On error, -1 plus an
error message is returned. The following Lua code is an example
of a simple handler printing the artifact’s content:
--- Lua Handler.
--
--- @param  image  img_type  Lua equivalent of `struct img_type`
--- @return number           # 0 on success, 1 on error
function lua_handler(image)
    err, msg = image:read(function(data) print(data) end)
    if err ~= 0 then
        swupdate.error(string.format("Error reading image: %s", msg))
        return 1
    end
    return 0
end
Using the image:read() method, an artifact’s contents may be
(post-)processed in and leveraging the power of Lua without relying
on preexisting C handlers for the purpose intended.
Just as C handlers, a Lua handler must consume the artifact
described in its image parameter so that SWUpdate can
continue with the next artifact in the stream after the Lua handler
returns. Chaining handlers, calling image:copy2file(), or using
image:read() satisfies this requirement.
The swupdate Lua module interface specification that details what
functionality is made available to Lua handlers by SWUpdate’s
corelib/lua_interface.c is found in handlers/swupdate.lua.
It serves as reference, for mocking purposes, and type checking thanks
to the EmmyLua-inspired annotations.
Note that although the dynamic nature of Lua handlers would
technically allow one to embed them into a to be processed .swu
image, this is not implemented as it carries some security
implications since the behavior of SWUpdate is changed
dynamically.
Lua Handler Interface Specification
  1--[[
  2
  3    SWUpdate Lua Handler Interface.
  4
  5    Interface specification for the Lua module
  6    provided by SWUpdate to Lua Handlers.
  7    See: corelib/lua_interface.c
  8
  9    Copyright (C) 2022, Siemens AG
 10    Author: Christian Storm <christian.storm@siemens.com>
 11
 12    SPDX-License-Identifier: GPL-2.0-or-later
 13
 14--]]
 15
 16---@diagnostic disable: missing-return
 17---@diagnostic disable: unused-local
 18-- luacheck: no unused args
 19
 20
 21--- SWUpdate Lua Handler Module.
 22--- @class swupdate
 23local swupdate = {}
 24
 25
 26--- @enum swupdate.RECOVERY_STATUS
 27--- Lua equivalent of `RECOVERY_STATUS` as in `include/swupdate_status.h`.
 28swupdate.RECOVERY_STATUS = {
 29    IDLE       = 0,
 30    START      = 1,
 31    RUN        = 2,
 32    SUCCESS    = 3,
 33    FAILURE    = 4,
 34    DOWNLOAD   = 5,
 35    DONE       = 6,
 36    SUBPROCESS = 7,
 37    PROGRESS   = 8
 38}
 39
 40--- Lua equivalent of `ERROR(format, ...)`.
 41--- @param format  string  Format string
 42--- @param ...     any     Varargs as referenced in format string
 43swupdate.error = function(format, ...) end
 44
 45--- Lua equivalent of `TRACE(format, ...)`.
 46--- @param format  string  Format string
 47--- @param ...     any     Varargs as referenced in format string
 48swupdate.trace = function(format, ...) end
 49
 50--- Lua equivalent of `INFO(format, ...)`.
 51--- @param format  string  Format string
 52--- @param ...     any     Varargs as referenced in format string
 53swupdate.info  = function(format, ...) end
 54
 55--- Lua equivalent of `WARN(format, ...)`.
 56--- @param format  string  Format string
 57--- @param ...     any     Varargs as referenced in format string
 58swupdate.warn  = function(format, ...) end
 59
 60--- Lua equivalent of `DEBUG(format, ...)`.
 61--- @param format  string  Format string
 62--- @param ...     any     Varargs as referenced in format string
 63swupdate.debug = function(format, ...) end
 64
 65--- Lua equivalent of `notify(PROGRESS, ..., msg)`.
 66--- @param msg    string        Message to send to progress interface
 67--- @param cause  number | nil  `progress_cause_t` value as defined in `include/progress_ipc.h`
 68swupdate.progress = function(msg, cause) end
 69
 70--- Lua equivalent of `notify(status, error, INFOLEVEL, msg)`.
 71--- @param status  swupdate.RECOVERY_STATUS  Current status, one of `swupdate.RECOVERY_STATUS`'s values
 72--- @param error   number                    Error code
 73--- @param msg     string                    Message
 74swupdate.notify = function(status, error, msg) end
 75
 76
 77--- Report whether dry-run installation is performed.
 78--
 79--- @return boolean  # `true` if dry-run installation is performed, `false` otherwise
 80swupdate.is_dryrun = function() end
 81
 82
 83--- Update progress.
 84--
 85--- @param percent  number  Progress percent to set
 86swupdate.progress_update = function(percent) end
 87
 88
 89--- Mount a filesystem to a temporary mountpoint.
 90--
 91--- @param  device      string  Device to mount
 92--- @param  filesystem  string  Device's filesystem
 93--- @return string | nil        # Mountpoint for use with `swupdate.umount(target)`, `nil` on error
 94swupdate.mount = function(device, filesystem) end
 95
 96--- Unmount a mountpoint returned by `swupdate.mount()`.
 97--
 98--- @param  target  string  Mountpoint to unmount
 99--- @return boolean | nil   # `true` if successful, `nil` on error
100swupdate.umount = function(target) end
101
102
103--- @enum swupdate.ROOT_DEVICE
104--- Lua equivalent of `root_dev_type` as in `include/lua_util.h`.
105swupdate.ROOT_DEVICE = {
106    PATH      = 0,
107    UUID      = 1,
108    PARTUUID  = 2,
109    PARTLABEL = 3
110}
111
112
113--- Current root device information.
114--- @class swupdate.rootdev
115--- @field type   swupdate.ROOT_DEVICE  Root device type, one of `swupdate.ROOT_DEVICE`'s values
116--- @field value  string                Root device path
117--- @field path   string                Full root device path, if identified, else nil
118
119--- Get current root device.
120--
121--- @return swupdate.rootdev  # Table containing type, and (full) path to root device
122swupdate.getroot = function() end
123
124--- Get the HW boot device of an eMMC.
125--
126--- @param devicepath  string  Fully qualified device path
127--- @return integer            # eMMC boot device number or `-1` on error
128swupdate.emmcbootpart = function(devicepath) end
129
130
131--- Table with major/minor numbers of the device on which the swupdate.stat()'d file resides.
132--- @class swupdate.stat_dev
133--- @field major  number  Major device number
134--- @field minor  number  Minor device number
135
136--- `struct stat`-alike Table.
137--- @class swupdate.stat_info
138--- @field mode          "directory"|"named pipe"|"link"|"regular file"|"socket"|"block device"|"char device"|"unknown"  File type and mode
139--- @field dev           swupdate.stat_dev  ID of device containing file
140--- @field ino           number             Inode number
141--- @field nlink         number             Number of hard links
142--- @field uid           number             User ID of owner
143--- @field gid           number             Group ID of owner
144--- @field rdev          swupdate.stat_dev  Device ID (if special file)
145--- @field access        string             Time of last access, e.g., "Wed Jun 30 21:49:08 1993"
146--- @field modification  string             Time of last modification, e.g., "Wed Jun 30 21:49:08 1993"
147--- @field change        string             Time of last status change, e.g., "Wed Jun 30 21:49:08 1993"
148--- @field size          number             Total size, in bytes
149--- @field permissions   string             Unix file permissions string, e.g., "rwxr-xr-x"
150--- @field blocks        number             Number of 512B blocks allocated
151--- @field blksize       number             Block size for filesystem I/O
152
153--- STAT(2) Wrapper.
154--
155--- @param  pathname  string          Retrieve information about the file `pathname`
156--- @return swupdate.stat_info | nil  # `struct stat`-alike Table if successful, nil on error
157swupdate.stat = function(pathname) end
158
159
160--- Get SWUpdate's TMPDIRSCRIPT directory.
161--
162--- @return string  # TMPDIRSCRIPT directory
163swupdate.tmpdirscripts = function() end
164
165--- Get SWUpdate's TMPDIR directory.
166--
167--- @return string  # TMPDIR directory
168swupdate.tmpdir = function() end
169
170
171--- SWUpdate hardware information.
172--- @class swupdate.hardware
173--- @field boardname   string  SWUpdate's boardname
174--- @field revision    string  SWUpdate's revision
175
176--- Get SWUpdate hardware.
177--
178--- @return swupdate.hardware  # Table with 'boardname' and 'revision' fields
179swupdate.get_hw = function() end
180
181
182--- SWUpdate version information.
183--- @class swupdate.version
184--- @field [1]         number  SWUpdate's version
185--- @field [2]         number  SWUpdate's patch level
186--- @field version     number  SWUpdate's version
187--- @field patchlevel  number  SWUpdate's patch level
188
189--- Get SWUpdate version.
190--
191--- @return swupdate.version  # Table with 'version' and 'patchlevel' fields
192swupdate.getversion = function() end
193
194
195--- Get software Selection and Mode.
196--
197--- @return string  # Selection
198--- @return string  # Mode
199swupdate.get_selection = function() end
200
201--- Get Linux Command Line Parameters
202--
203--- @return table  # Table with keys and values fields
204swupdate.get_cmdline = function() end
205
206--- Set Bootloader environment key=value.
207--
208--- @param key    string  Bootloader environment key to set
209--- @param value  string  Value to set `key` to in bootloader environment
210swupdate.set_bootenv = function(key, value) end
211
212--- Get Bootloader environment key's value.
213--
214--- @param  key  string  Bootloader environment's key to get value from
215--- @return string       # Bootloader environment key's value, empty if key absent
216swupdate.get_bootenv = function(key) end
217
218--- Get table with linux kernel command line
219--
220--- @return table       # Table with keys and value, for example t[root] return root device
221swupdate.get_cmdline = function() end
222
223--- @enum swupdate.HANDLER_MASK
224--- Lua equivalent of `HANDLER_MASK` as in `include/handler.h`.
225swupdate.HANDLER_MASK = {
226    IMAGE_HANDLER      = 1,
227    FILE_HANDLER       = 2,
228    SCRIPT_HANDLER     = 4,
229    BOOTLOADER_HANDLER = 8,
230    PARTITION_HANDLER  = 16,
231    NO_DATA_HANDLER    = 32,
232    ANY_HANDLER        = 1 + 2 + 4 + 8 + 16 + 32
233}
234
235--- Register a Lua function as Handler implementation.
236--
237-- The signature of the function to be registered as Handler implementation is:
238--
239-- --- @param  image     img_type  Lua equivalent of `struct img_type`
240-- --- @param  fn | nil  string    `preinst` or `postinst` for `SCRIPT_HANDLER`s, else nil
241-- --- @return number    # 0 on success, 1 on error
242-- function lua_handler(image, fn)
243--     ...
244-- end
245--
246--- @param name     string    Registered Handler's name
247--- @param funcptr  function  Function to register as Handler implementation
248--- @param mask     number    Type(s) for which to register the Handler, one or more ORed values of `swupdate.HANDLER_MASK`
249swupdate.register_handler = function(name, funcptr, mask) end
250
251
252--- Lua equivalent of `struct img_type {...}` as in `include/swupdate.h` plus `read()` and `copy2file()` functions.
253--- @class img_type
254--- @field name                  string    `sw-component` name to check with `sw-versions`
255--- @field version               string    `sw-component` version to check with `sw-versions`
256--- @field filename              string    File name in CPIO archive
257--- @field volume                string    If handler is "ubivol", the UBI volume name
258--- @field type                  string    The Handler name
259--- @field device                string    Device node to operate on for mounting, flashing, ...
260--- @field path                  string    For FILE_HANDLERs: the relative destination path
261--- @field mtdname               string    MTD device where image must be installed
262--- @field data                  string    Handler-specific arbitrary data
263--- @field filesystem            string    For FILE_HANDLERs: the filesystem to mount
264--- @field ivt                   string    IVT of an encrypted artifact
265--- @field installed_directly    boolean   Whether to stream image to `device` w/o temporary copy
266--- @field install_if_different  boolean   Whether to compare `name` and `version` accordingly
267--- @field install_if_higher     boolean   Whether to compare `name` and `version` accordingly
268--- @field encrypted             boolean   Whether the artifact is encrypted
269--- @field partition             boolean   Whether the artifact is a partitioner
270--- @field script                boolean   Whether the artifact is a script
271--- @field preserve_attributes   boolean   Whether to preserve attributes in archives
272--- @field offset                number    Offset to seek to in artifact
273--- @field size                  number    Artifact size
274--- @field checksum              number    Computed checksum
275--- @field skip                  number    `skip_t` enum number as in `include/swupdate.h`
276--- @field compressed            string    `zlib`, `xz`, `zstd` or `lz4` (boolean value is deprecated)
277--- @field properties            table     Properties Table equivalent as specified in `sw-description`
278--- @field sha256                string    sha256 hash of the image, file, or script
279local img_type = {
280    --- Store the current image artifact to disk.
281    --
282    --- @param  self  img_type  This `img_type` instance
283    --- @param  path  string    Path to store the current image artifact to
284    --- @return number          # 0 on success, -1 on error
285    --- @return string | nil    # nil on success, error message on failure
286    ['copy2file'] = function(self, path) end,
287
288    --- Process the current image artifact in Lua.
289    --
290    -- The `callback = function(chunk) ... end` is repeatedly called with
291    -- chunked artifact data of type `string` in its `chunk` parameter as
292    -- long as there is data available.
293    -- The callback function must completely consume the artifact data so
294    -- that SWUpdate can continue with the stream's next artifact after
295    -- the Lua Handler returns.
296    --
297    --- @param  self      img_type  This `img_type` instance
298    --- @param  callback  function  Callback `function(chunk) ... end` that is fed the current image artifact in chunks.
299    --- @return number              # 0 on success, -1 on error
300    --- @return string | nil        # nil on success, error message on failure
301    ['read'] = function(self, callback) end,
302}
303
304
305--- @class swupdate.handler
306--- Chain-callable SWUpdate Handlers (Non-exhaustive).
307--
308-- Note: This list of built-in Handlers is non-exhaustive and
309-- purely illustrative. At run-time, SWUpdate populates this
310-- Table with the actually available Handlers according to its
311-- compile-time configuration and Lua Handlers loaded.
312--
313--- @type table<string, number>
314swupdate.handler = {
315    --- Archive Handler (See: `handlers/archive_handler.c`).
316    ["archive"]        = 1,
317    --- `tar` Archive Handler (See: `handlers/archive_handler.c`).
318    ["tar"]            = 1,
319    --- Bootloader Handler (See: `handlers/boot_handler.c`).
320    ["bootloader"]     = 1,
321    --- "dummy" Handler (See: `handlers/dummy_handler.c`).
322    ["dummy"]          = 1,
323    --- Delta Handler (See: `handlers/delta_handler.c`).
324    ["delta"]          = 1,
325    --- Disk Format Handler (See: `handlers/diskformat_handler.c`).
326    ["diskformat"]     = 1,
327    --- Disk Partition Handler (See: `handlers/diskpart_handler.c`).
328    ["diskpart"]       = 1,
329    --- Toggle Boot Flag Handler (See: `handlers/diskpart_handler.c`).
330    ["toggleboot"]     = 1,
331    --- Flash Hamming1 Handler (See: `handlers/flash_hamming1_handler.c`).
332    ["flash-hamming1"] = 1,
333    --- Flash Handler (See: `handlers/flash_handler.c`).
334    ["flash"]          = 1,
335    --- Raw Image Handler (See: `handlers/raw_handler.c`).
336    ["raw"]            = 1,
337    --- Raw File Handler (See: `handlers/raw_handler.c`).
338    ["rawfile"]        = 1,
339    --- Raw Copy Handler (See: `handlers/raw_handler.c`).
340    ["rawcopy"]        = 1,
341    --- rdiff Image Handler (See: `handlers/rdiff_handler.c`).
342    ["rdiff_image"]    = 1,
343    --- rdiff File Handler (See: `handlers/rdiff_handler.c`).
344    ["rdiff_file"]     = 1,
345    --- Readback Handler (See: `handlers/readback_handler.c`).
346    ["readback"]       = 1,
347    --- Remote Handler (See: `handlers/remote_handler.c`).
348    ["remote"]         = 1,
349    --- SSBL Handler (See: `handlers/ssbl_handler.c`).
350    ["ssblswitch"]     = 1,
351    --- SWU Forward Handler (See: `handlers/swuforward_handler.c`).
352    ["swuforward"]     = 1,
353    --- UBI Volume Handler (See: `handlers/ubivol_handler.c`).
354    ["ubivol"]         = 1,
355    --- UBI Partition Handler (See: `handlers/ubivol_handler.c`).
356    ["ubipartition"]   = 1,
357    --- UBI Swap Handler (See: `handlers/ubivol_handler.c`).
358    ["ubiswap"]        = 1,
359    --- ucfw Handler (See: `handlers/ucfw_handler.c`).
360    ["ucfw"]           = 1,
361    --- Unique UUID Handler (See: `handlers/uniqueuuid_handler.c`).
362    ["uniqueuuid"]     = 1,
363}
364
365--- Chain-call another Handler.
366--
367--- @param  handler  string    Chain-called Handler's name
368--- @param  image    img_type  Lua equivalent of `struct img_type` as in `include/swupdate.h`
369--- @return number             # 0 on success, 1 on failure
370--- @return string | nil       # nil on success, error message on failure
371swupdate.call_handler = function(handler, image) end
372
373
374return swupdate
Shell script handler
This handler allows to run a shell script that is packed into the SWU. Please note that running a shell script opens a set of different security issues. Shell scripts are supported due to their large acceptance, but you should prefer Lua Scripts.
SWUpdate will run the binary shell “/bin/sh” to execute the script.
Lua script handler
A Lua Script handler runs a script in Lua language. There are two possible ways to run the script:
local: the script runs in own (isolated) Lua state that is created for the script. The script has access only to function defined inside the script or functions provided by external libraries, like the internal SWUpdate library called via “require(swupdate)”.
global: SWUpdate create a Lua state at the beginning of an Update and this is valid until the update is terminated. In this case, the script has access to any function and structure that was defined during the update. For example, a function can be defined inside sw-description, and the script can call it.
As default, each script runs in isolated / local Lua state. If the property “global-state” is set, then the common Lua state used for each Update transaction is taken.
Scripts ran in isolated context in previous versions. SWUpdate allocates a new Lua state, and import the basic libraries before loading the script. A script is then isolated, but it cannot access to function already loaded, or it is not possible to reuse functions from 2 or more scripts.
With the introduction of a per installation Lua state, Lua scripts can call functions already defined in previous scripts, or defined in sw-description. Because when a script is loaded, existing functions with the same name are overwritten, it was decided that functions in scripts must be unique, that is each function should be declared just once during an installation process.
This means that for global state, sw-description should contain the name of the function for each step (pre- , postinstall or postfailure) that should be called: the names preinst, postinst and postfailure are still valid in case the script runs with isolated state.
This allows also to load a script without executing if no functions are defined, and functions in the script can be called by later scripts.
Note that the handler will load the script in case of global state just once during the “preinstall” call. Later, it is assumed that functions will be already available.
Example:
scripts: (
    {
        filename = "testscript.lua";
        type = "lua";
        properties: {
            global-state = "true";
            preinstall = "pretest1";
        }
    },
    {
        filename = "test2script.lua";
        type = "lua";
        properties: {
            global-state = "true";
            postinstall = "posttest2";
            postfailure = "failure";
        }
}
Two scripts are defined. Both are using the global Lua state. Functions in test2script can find and run functions defined in testscript.lua, because both are belonging to the same context. When preinstall scripts are called, only the function “pretest1” from the first script is called, because no function name is defined for this step with the following scripts.
Remote handler
Remote handlers are thought for binding legacy installers without having the necessity to rewrite them in Lua. The remote handler forward the image to be installed to another process, waiting for an acknowledge to be sure that the image is installed correctly. The remote handler makes use of the zeromq library - this is to simplify the IPC with Unix Domain Socket. The remote handler is quite general, describing in sw-description with the “data” attribute how to communicate with the external process. The remote handler always acts as client, and try a connect() using the socket identified by the “data” attribute. For example, a possible setup using a remote handler could be:
images: (
        {
            filename = "myimage"";
            type = "remote";
            data = "test_remote";
         }
)
The connection is instantiated using the socket test_remote (according
to the “data” field’s value) in the directory pointed to by the environment
variable TMPDIR with /tmp as fall-back if TMPDIR is not set.
If connect() fails, the remote handler signals that the update is not
successful. Each zeromq message from SWUpdate is a multi-part message split
into two frames:
first frame contains a string with a command.
second frame contains data and can be of 0 bytes.
There are currently just two possible commands: INIT and DATA. After a successful connect, SWUpdate sends the initialization string in the format:
INIT:<size of image to be installed>
The external installer is informed about the size of the image to be installed, and it can assign resources if it needs. It will answer with the string ACK or NACK. The first NACK received by SWUpdate will interrupt the update. After sending the INIT command, the remote handler will send a sequence of DATA commands, where the second frame in message will contain chunks of the image to be installed. It is duty of the external process to take care of the amount of data transferred and to release resources when the last chunk is received. For each DATA message, the external process answers with a ACK or NACK message.
SWU forwarder
The SWU forwarder handler can be used to update other systems where SWUpdate
is running. It can be used in case of master / slaves systems, where the master
is connected to the network and the “slaves” are hidden to the external world.
The master is then the only interface to the world. A general SWU can contain
embedded SWU images as single artifacts, and the SWU handler will forward it
to the devices listed in the description of the artifact.
The handler can have a single “url” properties entry with an array of urls. Each url
is the address of a secondary board where SWUpdate is running with webserver activated.
The SWU handler expects to talk with SWUpdate’s embedded webserver. This helps
to update systems where an old version of SWUpdate is running, because the
embedded webserver is a common feature present in all versions.
The handler will send the embedded SWU to all URLs at the same time, and setting
installed-directly is supported by this handler.
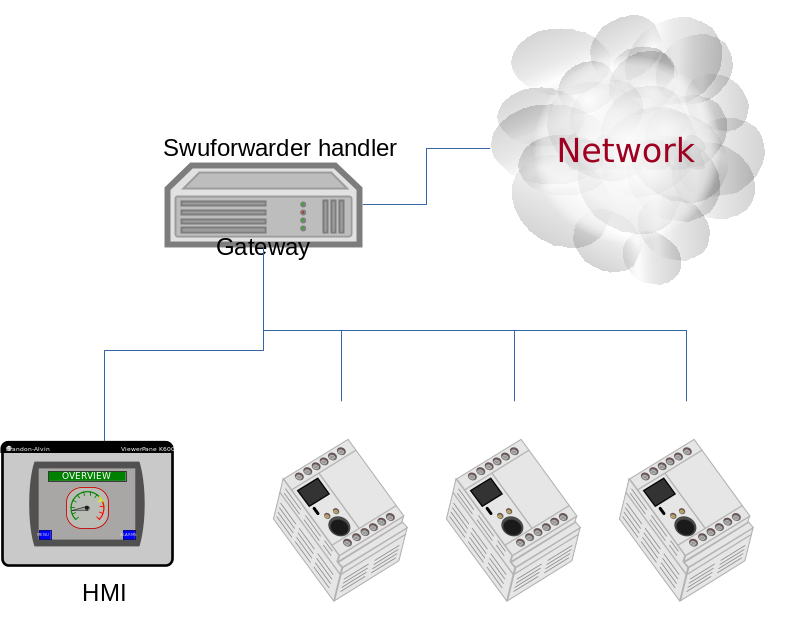
The following example shows how to set a SWU as artifact and enables the SWU forwarder:
images: (
        {
                filename = "image.swu";
                type = "swuforward";

                properties: {
                        url = ["http://192.168.178.41:8080", "http://192.168.178.42:8080"];
                };
        });
The SWU forwarder can be used as generic uploader to an URL. This is requires to enable Lua support. The back channel should still run via Websocket, if the connected server should communicate a progress status. The handler allows to link an own Lua code that is able to parse the incoming data, and report an error. The properties field should contain the name of the Lua function that should be called to parse the answer from the remote system. Note that the data passed to Lua is converted to a string (and null terminated).
images: (
        {
                filename = "image.swu";
                type = "swuforward";

                properties: {
                        url = ["http://192.168.178.41", "http://192.168.178.42];
                        parser-function = "parse_answer";
                };
        });
The parser function should be already loaded. The Lua function receives as input a string with the data received via the Websocket back channel. The function will read the data and return a single scalar value of swupdate_status, that is one of swupdate.RECOVERY_STATUS.*. Example:
function parse_answer(s)
        if string.match (s, 'SUCCESS') then
                return swupdate.RECOVERY_STATUS.SUCCESS
        end
        if string.match (s, 'FAILURE') then
                return swupdate.RECOVERY_STATUS.FAILURE
        end

        return swupdate.RECOVERY_STATUS.RUN

end";
The handler evaluates the return value, and stops when one of SUCCESS or FAILURE is returned.
If no parser-function is passed, the handler will run the internal parser used to connect remote SWUpdate systems, and expects to see a JSON message sent by the Mongoose Webserver.
rdiff handler
The rdiff handler adds support for applying binary delta patches generated by librsync’s rdiff tool.
Naturally, the smaller the difference between the diff’s source and target, the more effective is using this handler rather than shipping the full target, e.g., via the image handler. Hence, the most prominent use case for the rdiff handler is when having a read-only root filesystem and applying a small update like security fixes or feature additions. If the sweet spot is crossed, an rdiff patch may even exceed the full target’s size due to necessary patch metadata. Also note that in order to be most effective, an image to be processed with rdiff should be built deterministic (see reproducible-builds.org).
The rdiff algorithm requires no resources whatsoever on the device as the patch is fully computed in the backend. Consequently, the backend has to have knowledge of the current software running on the device in order to compute a sensible patch. Alike, the patch has to be applied on the device to an unmodified source as used in the backend for patch computation. This property is in particular useful for resource-constrained devices as there’s no need for the device to, e.g., aid in the difference computation.
First, create the signature of the original (base) file via
rdiff signature <basefile> <signaturefile>.
Then, create the delta file (i.e., patch) from the original base file to the target
file via rdiff delta <signaturefile> <targetfile> <deltafile>.
The <deltafile> is the artifact to be applied via this handler on the device.
Essentially, it mimics running rdiff patch <basefile> <deltafile> <targetfile>
on the device. Naturally for patches, the very same <basefile> has to be used
for creating as well as for applying the patch to.
This handler registers itself for handling files and images. An exemplary sw-description fragment for the files section is
files: (
    {
        type = "rdiff_file"
        filename = "file.rdiff.delta";
        path = "/usr/bin/file";
    }
);
Note that the file referenced to by path serves as <basefile> and
gets replaced by a temporary file serving as <targetfile> while the rdiff
patch processing.
An exemplary sw-description fragment for the images section is
images: (
    {
        type = "rdiff_image";
        filename = "image.rdiff.delta";
        device = "/dev/mmcblk0p2";
        properties: {
            rdiffbase = ["/dev/mmcblk0p1"];
        };
    }
);
Here, the property rdiffbase qualifies the <basefile> while the device
attribute designates the <targetfile>.
Note that there’s no support for the optional offset attribute in the
rdiff_image handler as there’s currently no apparent use case for it and
skipping over unchanged content is handled well by the rdiff algorithm.
ucfw handler
This handler allows one to update the firmware on a microcontroller connected to the main controller via UART. Parameters for setup are passed via sw-description file. Its behavior can be extended to be more general. The protocol is ASCII based. There is a sequence to be done to put the microcontroller in programming mode, after that the handler sends the data and waits for an ACK from the microcontroller.
The programming of the firmware shall be:
Enter firmware update mode (bootloader)
Set “reset line” to logical “low”
Set “update line” to logical “low”
Set “reset line” to logical “high”
Send programming message
$PROG;<<CS>><CR><LF>
to the microcontroller. (microcontroller will remain in programming state)
microcontroller confirms with
$READY;<<CS>><CR><LF>
Data transmissions package based from mainboard to microcontroller package definition:
within a package the records are sent one after another without the end of line marker <CR><LF>
the package is completed with <CR><LF>
The microcontroller requests the next package with $READY;<<CS>><CR><LF>
Repeat step 4 and 5 until the complete firmware is transmitted.
The keypad confirms the firmware completion with $COMPLETED;<<CS>><CR><LF>
- Leave firmware update mode
Set “Update line” to logical “high”
Perform a reset over the “reset line”
<<CS>> : checksum. The checksum is calculated as the two’s complement of the modulo-256 sum over all bytes of the message string except for the start marker “$”. The handler expects to get in the properties the setup for the reset and prog gpios. They should be in this format:
properties = {
        reset = "<gpiodevice>:<gpionumber>:<activelow>";
        prog = "<gpiodevice>:<gpionumber>:<activelow>";
}
Example:
images: (
    {
        filename = "microcontroller-image";
        type = "ucfw";
        device = "/dev/ttymxc5";

        properties: {
            reset =  "/dev/gpiochip0:38:false";
            prog =  "/dev/gpiochip0:39:false";
        };
    }
);
SSBL Handler
This implements a way to switch two software sets using a duplicated structure saved on the flash (currently, only NOR flash is supported). Each of the two structures contains address and size of the image to be loaded by a first loader. A field contain the “age”, and it is incremented after each switch to show which is the active set.
SSBL Magic Number (29 bit)Name |
Age (3 bit) |
Image Address Offset |
|
Image Size |
|
The handler implements a post install script. First, it checks for consistency the two structures and find the active reading the first 32 bit value with a magic number and the age. It increments the age and saves the new structure in the inactive copy. After a reboot, the loader will check it and switch the software set.
scripts: (
        {
                type = "ssblswitch";
                properties: {
                        device = ["mtdX", "mtdY"];
                        offset = ["0", "0"];
                        imageoffs = ["0x780000",  "0xA40000"];
                        imagesize = ["0x800000", "0x800000"];
                }
}
Properties in sw-description are all mandatory. They define where the SSBL Administration data are stored for both sets. Each properties is an array of two entries, containing values for each of the two SSBL administration.
Name |
Type |
Description |
|---|---|---|
device |
string |
MTD device where the SSBL Admin Header is stored |
offset |
hex |
Offset of SSBL header inside the MTD device |
imageoffset |
hex |
Offset of the image to be loaded by a bootloader when this SSBL is set. |
imagesize |
hex |
Size of the image to be loaded by a bootloader when this SSBL is set. |
Readback Handler
To verify that an image was written properly, this readback handler calculates the sha256 hash of a partition (or part of it) and compares it against a given hash value.
The following example explains how to use this handler:
scripts: (
{
    device = "/dev/mmcblk2p1";
    type = "readback";
    properties: {
        sha256 = "e7afc9bd98afd4eb7d8325196d21f1ecc0c8864d6342bfc6b6b6c84eac86eb42";
        size = "184728576";
        offset = "0";
    };
}
);
Properties size and offset are optional, all the other properties are mandatory.
Name |
Type |
Description |
|---|---|---|
device |
string |
The partition which shall be verified. |
type |
string |
Identifier for the handler. |
sha256 |
string |
Expected sha256 hash of the partition. |
size |
string |
Data size (in bytes) to be verified. If 0 or not set, the handler will get the partition size from the device. |
offset |
string |
Offset (in bytes) to the start of the partition. If not set, default value 0 will be used. |
Copy handler
The copy handler copies one source to a destination. It is a script handler, and no artifact in the SWU is associated with the handler. It can be used to copy configuration data, or parts that should be taken by the current installation. It requires the mandatory property (copyfrom), while device contains the destination path. The handler performs a byte copy, and it does not matter which is the source - it can be a file or a partition. An optional type field can set if the handler is active as pre or postinstall script. If not set, the handler is called twice.
Name |
Type |
Description |
|---|---|---|
device |
string |
If set, it is the destination. |
type |
string |
One of “preinstall” or “postinstall” |
Name |
Type |
Description |
|---|---|---|
size |
string |
Data size (in bytes) to be copied. If 0 or not set, the handler will try to find the size from the device. |
offset |
string |
Value in dec or hex with the offset to be set for the source file (to copy just a part). |
chain |
string |
Handler to be called to install the data read from the “copyfrom” source. |
recursive |
string |
Recursive copy if copyfrom is a directory (“true” or “false”) |
create- destination |
string |
Create the destination path if it does not exist (“true” or “false”) |
scripts : (
        {
        device = "/dev/mmcblk2p1";
        type = "copy";
        properties : {
                copyfrom = "/dev/mmcblk2p2";
                type = "postinstall";
                chain = "raw";
        }
}
Bootloader handler
The bootloader handler allows to set bootloader’s environment with a file. The file should have the format:
# Comments are allowed using the hash char

varname=value
Empty lines are skipped. This simplifies the update of the whole environment instead of setting each variable inside the “bootenv” section in sw-description. The property nooverride allows to skip variables that are already set in sw-description. If not set, variables set in bootenv are overwritten.
images: (
        {
                filename = "uEnv.txt";
                type = "bootloader";
                properties: {
                        nooverride = "true";
                }
        }
);

bootenv: (
{
        name = "bootenv01key";
        value = "SOME VALUE";
});
In the example above, bootenv01key is not overwritten by a value in uEnv.txt because the flag “nooverride” is set.
eMMC handler
This is a script handler used to manage the eMMC boot partitions.
The emmc_boot selects the eMMC hardware boot partition based
on the device name. The number following boot in the device path
is used to determine the boot partition to be selected:
/dev/mmcblkXboot0selects boot partition 0/dev/mmcblkXboot1selects boot partition 1
The emmc_boot_toggle toggles the active eMMC hardware boot
partition for the specified device.
Example selecting boot partition 1:
scripts: (
{
   type = "emmc_boot";
   device = "/dev/mmcblk1boot1";
}
Example toggling the active boot partition:
scripts: (
{
   type = "emmc_boot_toggle";
   device = "/dev/mmcblk1";
}
Archive handler
The archive handler extracts an archive to a destination path. It supports whatever format libarchive has been compiled to support, for example even if SWUpdate itself has no direct support for xz it can be possible to extract tar.xz files with it.
The attribute preserve-attributes must be set to preserve timestamps. uid/gid (numeric) and extended attributes. File modes (such as chmod 0755/0600) are always preserved.
The property create-destination can be set to the string true to have SWUpdate create the destination path before extraction.
files: (
        {
                filename = "examples.tar.zst";
                type = "archive";
                path = "/extract/here";
                preserve-attributes = true;
                installed-directly = true;
                properties: {
                        create-destination = "true";
                }
        }
);
Disk partitioner
This handler creates or modifies partitions using the library libfdisk. Handler must be put into the partitions section of sw-description. Setup for each partition is put into the properties field of sw-description. After writing the partition table it may create a file system on selected partitions. (Available only if CONFIG_DISKFORMAT is set.)
Name |
Type |
Description |
|---|---|---|
labeltype |
string |
“gpt” or “dos” |
nolock |
string |
“true” or “false” (default=false) This is like a force. If it is set, a lock failure will be ignored(lock will still be attempted). |
noinuse |
string |
“true” or “false” (default=false) If set, it does not require the device to be not in use (mounted, etc.) |
partition-X |
array |
Array of values belonging to the partition number X |
For each partition, an array of couples key=value must be given. The following keys are supported:
Name |
Type |
Description |
|---|---|---|
size |
string |
Size of partition. K, M and G can be used for Kilobytes, Megabytes and Gigabytes. |
start |
integer |
First sector for the partition |
name |
string |
Name of the partition |
type |
string |
Type of partition, it has two different meanings. It is the hex code for DOS (MBR) partition table or it is the string identifier in case of GPT. |
dostype |
string |
Type of DOS (MBR) partition entry when using a table with a “gpt” labeltype. Using this option will create a hybrid MBR table. It is the hex code for DOS (MBR) partition table. This would typically be used when one wants to use a GPT formatted disk with a board that requires a dos table entry for initial bootstrapping. Note: A maximum of 3 partitions can have a dostype specified, this limit only applies to dos table entries and does not affect partitions without a dostype specified. |
fstype |
string |
Optional filesystem type to be created on the partition. If no fstype key is given, no file will be created on the corresponding partition. vfat / ext2 / ext3 /ext4 / btrfs file system is supported |
partuuid |
string |
The partition UUID (GPT only). If omitted, a UUID will be generated automatically. |
flag |
string |
The following flags are supported: Dos Partition : “boot” set bootflag |
force |
string |
If set to “true”, existing file-system shall be overwritten uncoditionally. Default value is “false”. |
GPT example:
partitions: (
{
   type = "diskpart";
   device = "/dev/sde";
   properties: {
        labeltype = "gpt";
        partition-1 = [ "size=64M", "start=2048",
            "name=bigrootfs", "type=C12A7328-F81F-11D2-BA4B-00A0C93EC93B"];
        partition-2 = ["size=256M", "start=133120",
            "name=ldata", "type=EBD0A0A2-B9E5-4433-87C0-68B6B72699C7",
            "fstype=vfat"];
        partition-3 = ["size=512M", "start=657408",
            "name=log", "fstype =ext4", 63DAF-8483-4772-8E79-3D69D8477DE4"];
        partition-4 = ["size=4G", "start=1705984",
            "name=system",  "type=0FC63DAF-8483-4772-8E79-3D69D8477DE4"];
        partition-5 = ["size=512M", "start=10094592",
            "name=part5",  "type=0FC63DAF-8483-4772-8E79-3D69D8477DE4"];
   }
}
MBR Example:
partitions: (
{
   type = "diskpart";
   device = "/dev/sde";
   properties: {
        labeltype = "dos";
        partition-1 = [ "size=64M", "start=2048", "name=bigrootfs", "type=0x83"];
        partition-2 = ["size=256M", "start=133120", "name=ldata", "type=0x83"];
        partition-3 = ["size=256M", "start=657408", "name=log", "type=0x83"];
        partition-4 = ["size=6G", "start=1181696", "name=system",  "type=0x5"];
        partition-5 = ["size=512M", "start=1183744", "name=part5",  "type=0x83"];
        partition-6 = ["size=512M", "start=2234368", "name=part6",  "type=0x83"];
        partition-7 = ["size=16M", "start=3284992", "name=part7", "type=0x6",
            "fstype=vfat"];
   }
}
Toggleboot Handler
This handler is a script handler. It turns on the bootflag for one of a disk partition if the partition table is DOS. It reports an error if the table is GPT.
script: (
{
   type = "toggleboot";
   device = "/dev/sde";
   properties: {
        partition = "1";
   }
}
GPT Partition Handler
GPT Partition Installer
There is a handler gptpart that allows writing an image into a gpt partition selected by the name. This handler do not modify the gpt partition (type, size, …), it just writes the image in the GPT partition.
images: (
        {
                filename = "u-boot.bin";
                type = "gptpart";
                device = "/dev/vdb";
                volume = "u-boot-1";
                offset = "1024";
        },
        {
                filename = "kernel.bin";
                type = "gptpart";
                device = "/dev/vdb";
                volume = "kernel-1";
        },
);
GPT Partition Swap
There is a handler gptswap that allow to swap gpt partitions after all the images were flashed. This handler only swaps the name of the partition. It could be useful for a dual bank strategy. This handler is a script for the point of view of SWUpdate, so the node that provides it should be added in the section scripts.
Simple example:
scripts: (
        {
                type = "gptswap";
                device = "/dev/vdb";
                properties =
                {
                        swap-0 = [ "u-boot-0" , "u-boot-1" ];
                        swap-1 = [ "kernel-0" , "kernel-1" ];
                };
        },
);
Diskformat Handler
This handler checks if the device already has a file system of the specified
type. (Available only if CONFIG_DISKFORMAT is set.)
If the file system does not yet exist, it will be created.
In case an existing file system shall be overwritten, this can be achieved
by setting the property force to true.
partitions: (
{
        type = "diskformat";
        device = "/dev/loop0p1";

        properties: {
                fstype = "vfat";
                force = "true";
        }
})
Unique UUID Handler
This handler checks if the device already has a filesystems with a provide UUID. This is helpful in case the bootloader chooses the device to boot from the UUID and not from the partition number. One use case is with the GRUB bootloader when GRUB_DISABLE_LINUX_UUID is not set, as usual on Linux Distro as Debian or Ubuntu.
The handler iterates all UUIDs given in sw-description and raises error if one of them is found on the device. It is a partition handler and it runs before any image is installed.
partitions: (
{
        type = "uniqueuuid";
        properties: {
                fs-uuid = ["21f16cae-612f-4bc6-8ef5-e68cc9dc4380",
                           "18e12df1-d8e1-4283-8727-37727eb4261d"];
        }
});
BTRFS Handler
BTRFS Partition Handler
This handler is activated if support for BTRFS is on. It allows to created and delete subvolumes during an update.
partitions: (
{
        type = "btrfs";
        device = "/dev/loop0p1";

        properties: {
                command = < one of create" or "delete" >
                path = <path for the subvolume>;
                mount = "true" or missing;
                create-destination = "true" or missing;
        }
})
If mount is set, SWUpdate will mount the device and the path is appended to the mountpoint used with mount. If device is already mounted, path is the absolute path.
BTRFS Snapshot Handler
The handler allows to install a BTRFS snapshot created with the “btrfs send” command. SWUpdate is using the external “btrfs” utility, that must be installed on the target, and “btrfs receive” is executed by sending the stream to the command.
All generic features are available, that means that an artifact can be streamed by using the “installed-directly” attribute.
images: (
{
        filename = "btrfs-snapshot";
        type = "btrfs-receive";
        device = <optional, device with BTRFS fs, must be set if tomount is "true">;
        properties: {
                path = <mandatory, path where to install subvolume>;
                btrfs-cmd = <optional, path to btrfs command>;
                tomount = <boolean, optional, "true" / "false" >;
        }
})
If tomount is set, SWUpdate will temporary mount “device” as BTRFS filesystem and will try to install the snapshot to path. btrfs-cmd is optional, fallback is /usr/bin/btrfs.
Generic Executor Handler
The BTRFS snapshot handler requires to stream an artifact after normal handling (decompression, decryption, etc.) to the external command “btrfs” without any temporary copy. The same infrastructure can be used to stream any artifact to any arbitrary external command that accepts the stream as stdin. This is done with the “executor” handler.
{
        filename = "test";
        type = "executor";
        properties: {
                cmd = <mandatory, command to be executed in a pipe>;
        }
}
If create-destination is set, SWUpdate will create the destination path of the subvolume before creating it.
Delta Update Handler
The handler processes a ZCHUNK header and finds which chunks should be downloaded after generating the corresponding header of the running artifact to be updated. The handler uses just a couple of attributes from the main setup, and gets more information from the properties. The attributes are then passed to a secondary handler that will install the artifact after the delta handler has assembled it. The handler requires ZST because this is the compression format for Zchunk.
The SWU must just contain the ZCK’s header, while the ZCK file is put as it is on the server. The utilities in Zchunk project are used to build the ZCK file.
zck -u -h sha256 <artifact>
This will generates a file <arifact>.zck. To extract the header, use the zck_read_header utility:
HSIZE=`zck_read_header -v <artifact>.zck | grep "Header size" | cut -d':' -f2`
dd if=<artifact>.zck of=<artifact>.header bs=1 count=$((HSIZE))
The resulting header file must be packed inside the SWU.
Name |
Type |
Description |
|---|---|---|
url |
string |
This is the URL from where the handler will download the missing chunks. The server must support byte range header. |
source |
string |
name of the device or file to be used for the comparison. |
chain |
string |
this is the name (type) of the handler that is called after reassembling the artifact. |
zckfile |
string |
name of the external ZCK file. This is used only if URL is not present or it is set to “dynamic” |
max-ranges |
string |
Max number of ranges that a server can accept. Default value (150) should be ok for most servers. |
zckloglevel |
string |
this sets the log level of the zcklib. Logs are intercepted by SWupdate and appear in SWUpdate’s log. Value is one of debug,info warn,error,none |
debug-chunks |
string |
“true”, default is not set. This activates more verbose debugging output and the list of all chunks is printed, and it reports if a chunk is downloaded or copied from the source. |
source-size |
string |
This limits the index of the source It is helpful in case of filesystem in much bigger partition. It has the value for the size or it can be set to “detect” and the handler will try to find the effective size of fs. |
Example:
{
        filename = "software.header";
        type = "delta";

        device = "/dev/mmcblk0p2";
        properties: {
                url = "http://examples.com/software.zck";
                chain = "raw";
                source = "/dev/mmcblk0p3";
                zckloglevel = "error";
                /* debug-chunks = "true"; */
        };
}
It is not always possible to set the URL into sw-description. Hawkbit for example generates a URL when an artifact is uploaded, and URL is not available during build. The Hawkbit connector will send the URL to SWUpdate, that adds it to an own list. If the URL is not present as property, or it is set to “dynamic”, the handler asks the core for the URL for the “zckfile” property. Note that the URL is then not part of sw-description and for this reason not verified. Anyway, this is not a security issue, because all hashes related to the ZCK file are part of sw-description (as ZCK header), and each mismatch will stop the update.
The steps to use Delta Update are:
Hawkbit
create a distribution
add a software module to the distribution
in the “Upload”, adds both the SWU and the ZCK file. If you have multiple artifacts that will be installed as delta update, upload all required ZCK.
sw-description
Use the dynamic keyword to set the URL in the properties. SWUpdate will then check if there is a URL for the value of zckfile. Value of zckfile must be set to the filename of the ZCK file uploaded to the Hawkbit server. Example:
images: (
      {
              filename = "software.zck.header";
              type = "delta";

              device = "/dev/sde4";
              properties: {
                      url = "dynamic";
                      chain = "raw";
                      source = "/dev/sde5";
                      zckloglevel = "info";
                      source-size = "detect";
                      zckfile = "software.rootfs.ext4.zck";
              };
      }
Hawkbit has also some DOS countermeasures that should be deactivated, else Hawkbit thinks to be under attack and does not deliver the required chunks.
hawkbit.server.security.dos.filter.enabled=false hawkbit.server.security.dos.maxStatusEntriesPerAction=-1
Memory issue with zchunk
SWUpdate will create the header from the current version, often from a block partition. As default, Zchunk creates a temporary file with all chunks in /tmp, that is at the end concatenated to the header and written to the destination file. This means that an amount of memory equal to the partition (SWUpdate does not compress the chunks) is required. This was solved with later version of Zchunk - check inside zchunk code if ZCK_NO_WRITE is supported.
Docker Handlers
To improve containers update, a docker set of handlers implements part of the API to communicate with the docker daemon. Podman (another container solution) has a compatibility layer for docker REST API and could be used as well, but SWUpdate is currently not checking if a podman daemon must be started.
Goal of these handlers is just to provide the few API to update images and start containers - it does not implement the full API.
Docker Load Image
This handler allow to load an image without copying temporarily and push it to the docker daemon. It implements the /images/load entry point., and it is implemented as “image” handler. The file should be in a format accepted by docker.
images: (
{
        filename = "docker-image.tar"
        type = "docker_imageload";
        installed-directly = true;
});
The handler checks return value (JSON message) from the daemon, and returns with success if the image is added.
In case the file must be decompressed, SWUpdate requires the size of the decompressed image to be passed to the daemon:
images: (
{
        filename = "alpine.tar.gz";
        type = "docker_imageload";
        installed-directly = true;
        compressed = "zlib";
        properties: {
             decompressed-size = "5069312";
        };
});
Docker Remove Image
It is implemented as script (post install). Example:
scripts: ( {
        type = "docker_imagedelete";
        properties: {
                name = "alpine:3.4";
        };
});
Docker Delete Unused Images
It is implemented as script (post install). Example:
scripts: ( {
        type = "docker_imageprune";
});
Docker: container create
It is implemented as post-install script. The script itself is the json file passed to the daemon to configure and set the container. The container is just created, not started.
For example, having this hello-world.json file:
{
        "Image": "hello-world",
        "HostConfig": {
                "RestartPolicy": {
                        "Name": "always"
                },
        "AutoRemove": false
        }
}
Creating the container can be done in sw-description with:
scripts: ( {
        filename = "hello-world.json";
        type = "docker_containercreate";
        properties: {
                name = "helloworld"; /* Name of container */
        }
});
Docker Remove Container
It is implemented as script (post install). Example:
scripts: ( {
        type = "docker_containerdelete";
        properties: {
                name = "helloworld";
        };
});
Docker : Start / Stop containers
Examples:
scripts: ( {
        type = "docker_containerstart";
        properties: {
                name = "helloworld";
        };
});
scripts: ( {
        type = "docker_containerstop";
        properties: {
                name = "helloworld";
        };
});